Laboratory equipment and instruments are essential components of laboratories, but
special precautions are needed when utilizing them for research involving biohazards.
This chapter of the Biosafety Manual will provide guidance related to the use,
care, and disinfection of common laboratory equipment and instruments.
1.
PROCEDURE:
1.1. General Procedures
- All equipment that is utilized to manipulate, transport, or store biohazards
must be identified with the universal biohazard symbol.
- For laboratories at Health Sciences Center, prior to moving between laboratories, moving to surplus, or disposing, all equipment must be decontaminated. Refer to
Chapter 8: Decontamination, Disinfection, and Spill Response for equipment.
1.2. Equipment Specific Procedures
1.2.1. AUTOCLAVE
Autoclave Use
Refer to
Chapter 5: Biohazard Waste for guidance in operation of the autoclave.
Autoclave Maintenance
Spore Test
Autoclaves used to sterilize infectious medical waste that is being disposed of in
a sanitary landfill must undergo periodic spore tests. West Virginia Infectious
Medical Waste Program requires the autoclave sterilization be evaluated using
Bacillus stearothermophilus spores every forty hours of operation. The results
of this test must be recorded in the autoclave use log.
- Place the biological indicator inside an autoclave bag and place in the tray
with a load that needs autoclaved.
- Autoclave using the appropriate validated cycle for infectious medical waste.
- Once the cycle is complete, remove the tray with bags from the autoclave using
heat-resistant gloves and eye protection.
- Let the contents cool (at least 10-15 minutes).
- CAUTION: Biological indicators are hot and under pressure when removing from
the autoclave. Failure to allow sufficient cooling time may result in the
bursting of the ampule.
- Follow the manufacturer’s instructions for incubation time, temperature, and
reading test results.
- If the autoclaved indicator turns yellow or becomes turbid, evaluate the time,
temperature, and autoclave procedures. Contact an autoclave repair company
if a problem with the autoclave is suspected. Do not use the autoclave until
the problem is fixed and a successful biological indicator test has been performed.
- Regardless of results, document the autoclave test results in the autoclave log
along with any remediation that may have occurred.
1.2.2. BIOLOGICAL SAFETY CABINET
Biological Safety Cabinets (BSCs) are one of the most common forms of primary containment
in microbiological and biomedical laboratories. BSCs are designed to provide protection
to the operator, the environment, and the product.
Class II BSCs are required for use in BSL2 laboratories, especially for any procedure
that has the potential to generate aerosols. It is recommended that all work
with BSL2 biohazards be performed in the BSC.
Common procedures that generate aerosols include, but are not limited to:
- Centrifugation
- Vortexing
- Pipetting
- Tissue Homogenization
- Opening vacutainer tubes
- Changing animal bedding
Two types of Class II BSCs exist: A2 and B2. A2 BSCs are exhausted through HEPA filtration
back into the laboratory; therefore, do not provide any protection against chemical
gases or fumes. A2 cabinets can be connected to a hard-ducted exhaust
system via a canopy (thimble). This provides protection against some minute quantities
of volatile toxic chemicals. B2 BSCs are exhausted through HEPA filtration and
then through a hard-ducted exhaust system and additionally provide protection against
chemical gases and fumes. The biosafety office can help determine which type of
BSC is appropriate for your research.
BSC Certification
BSCs are required to be tested and recertified annually by a qualified outside
vendor.
Contact the Biosafety Office for a list of qualified outside vendors. The
vendor is responsible for verifying that the BSC is functioning properly, that
the air flows are adequate for safe operation, and verify the integrity of the
HEPA filter.
BSCs must be certified prior to initial use and recertified after being moved to
a new laboratory.
Proper BSC Use
Prior to use, turn on the blower and allow the BSC to run for at least 5 minutes
to purge the air inside the cabinet. Verify that the BSC has not exceeded its recertification
date. It is best practice to disinfect the working surface of the BSC prior to
use with a suitable disinfectant.
During use, do not overfill the cabinet. Only place in the BSC in what you need for
the procedure you are performing. Ensure none of the interior air grills are blocked
or covered. Ensure the front grill of the cabinet is unobstructed; do not place
equipment, papers, or rest your arms on the grill.
During use, the cabinet should be organized in a manner so that workflowsws from a
“clean side” to a “dirty side”. This will prevent cross contamination of your product.
Refer to Figure 1 for an example of BSC organization for a right-handed handed individual.
A left-handedhanded individual would prefer a reverse setup.
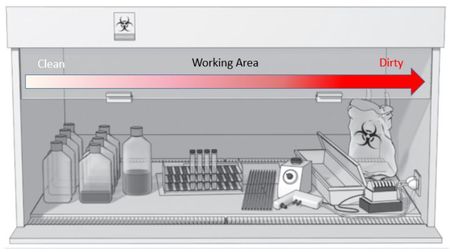
Figure 1. Example of BSC Organization
After use, disinfect all equipment prior to removing from the BSC. Lastly, disinfect
the interior surfaces of the BSC and allow the blower to run for at least 5 minutes
to purge the air inside the cabinet. Ensure a suitable disinfectant is utilized.
BSC Maintenance
- Routine maintenance of the BSC should include disinfecting all inner surfaces
and removing any debris or dust that may collect under the work area in the
lower plenum area.
- Bulbs within the BSC are required to be changed by the lab; Facilities Management
will not change bulbs.
- A qualified vendor must perform all other maintenance or repair of the unit,
including HEPA filter replacement. Gas decontamination may be required by the
vendor as part of the maintenance or repair.
Moving a BSC
Prior to moving a BSC to a different location, contact the Biosafety Office. The
BSC will need to be gas decontaminated by a qualified, outside vendor and verified
by the Biosafety office as decontaminated.
1.2.3. CENTRIFUGES
Hazards associated with centrifuges include the creation of aerosols, loss of containment,
and mechanical equipment failure. Care must be taken when centrifuging biohazards
to minimize centrifuge hazards.
Centrifuge Use
Prior to use, verify that the centrifuge is clean and that the rotor is not damaged
or has exceeded its life expectancy. To determine the life expectancy of a rotor,
check the manual or contact the manufacturer.
- During operation, use sealed test tubes.
- Avoid the use of glass test tubes when possible.
- Do not overfill the tubes.
- Ensure the load is properly balanced.
- It is highly recommended to use a
sealed, aerosol-tight rotor during centrifugation of biohazards when working
at BSL2 or higher.
- Sealed rotors, or tubes should be opened and manipulated within a BSC to reduce
the risk from aerosol production.
Centrifuge Maintenance
- Routine maintenance of a centrifuge should include disinfecting all inner surfaces
with a suitable disinfectant, including the rotor and/or buckets, and removing
any debris or dust that may collect within the unit.
- Observe the unit, including the rotor, or signs of wear or damage.
- Follow all manufacturer’s recommended guidelines for preventative maintenance
of unit.
1.2.4. COLD ROOMS
As cold rooms are usually shared among multiple labs, they create unique challenges
to ensure a clean and safe environment is maintained. Each lab that utilizes the
cold room must take responsibility in maintaining the room. Given the cold and
damp environment commonly encountered in cold rooms, mold growth is one of the
most common occupational hazards encountered.
Cold Room Use
- In order to minimize excess moisture from entering a cold room, it is imperative
to keep the cold room door firmly shut. Any spills or standing water should
be wiped dry promptly.
- Only those items that are needed should be brought in the cold room.
- Do not store non-essential items in the cold room.
- Shelving and other storage items must be made from plastic or metal.
-
Cellulose-based (cardboard, paper, wood, etc.) materials are NOT permitted
to be stored in the cold room. This is the primary cause of mold contamination
within a cold room.
If this policy is not followed, mold remediation is the responsibility of the
labs utilizing the cold room.
- Necessary paper products (kim wipes, paper towels, etc.) may be stored in the
cold room if they are stored within a closed, air-tight plastic container.
Plastic totes or tubs must be utilized in place of cardboard boxes.
Cold Room Maintenance
Cold rooms must be routinely disinfected to help maintain a mold-free environment.
Monthly surface disinfection within the cold room is recommended as best practice,
however at a minimum must be performed quarterly.
This should include all inner surfaces of the room, lab bench, chairs, storage/shelving,
and inlet and exhaust grills of the cooling blower.
An EPA registered, fungicidal disinfectant, such as Peroxigard (Rescue) is optimal,
as it will not damage metal surfaces. However, any fungicidal disinfectant is acceptable if an appropriate contact time is achieved. A 10% bleach solution is effective
to kill visible, vegetative mold, however, does not kill mold spores. Following
the use of bleach, any metal surfaces must be wiped with water to remove any bleach
residue. Bleach residue is corrosive to metal surfaces. Following disinfection,
all surfaces should be wiped dry so excess moisture does not remain in the cold
room.
CAUTION: Cold rooms typically have closed air circulation; the only source
of fresh air being when the door is open. If disinfecting with a bleach solution,
be aware that fumes will recirculate within the cold room and can cause mucus membrane
irritation even after a short period of time. The door should be proper ajar during
bleach disinfection.
Quarterly assessment of cold room inventory should be performed. During this assessment,
all expired items, items which are no longer needed within the room, and any items
with visible mold contamination must be removed or discarded.
1.2.5. FREEZERS AND REFRIGERATORS (COLD STORAGE)
Freezers and refrigerators are common pieces of equipment in laboratories for cold
storage. They present potential risks of exposure to biohazards if not properly
used or maintained. In addition to mold contamination, there is risk of exposure
to biohazards if contents are not properly stored. This section applies to laboratory
refrigerators, freezers (also referred to as -20 freezers), and Ultra Low Temperature
(ULT) freezers (also referred to as -80 freezers).
Cold Storage Use
All laboratory cold storage equipment must be marked with a “No Food or Drink” sign.
All tubes, flasks, beakers, or containers must be sealed closed with a solid lid
or cap. Parafilm alone is not an acceptable closure. All tubes, flasks, beakers,
or containers must always be stored upright within cold storage. Tubes, flasks,
beakers, or containers containing liquid solutions or suspensions of biohazards
should be closed with a lid and additionally be sealed with parafilm within cold
storage. All petri dishes containing microorganisms must be sealed with parafilm
within cold storage. Label all items with the full name of what is being stored,
along with name/initials and date of the person responsible for the item.
Biohazard and potentially biohazardous spills must be immediately decontaminated
and cleaned. Refer to
Chapter 8: Decontamination, Disinfection, and Spill Response for proper spill
response procedures.
Cold Storage Maintenance
A check of inventory within the cold storage should be routinely performed. Anything
damaged, expired, or no longer needed should be properly discarded.
At minimum, all contents of the cold storage equipment should be removed and the
inside wiped with an appropriate disinfectant once a year. Excessive frost should
be removed from any freezer.
1.2.6. IN-HOUSE VACUUM SYSTEMS
In-house vacuum systems are often used in labs that perform cell culture to remove
media from the cultures. Biohazard risk to the in-house vacuum system involves
any biohazards breaching the suction flask and being drawn into the system. To
prevent this from happening, a simple setup utilizing flask and filters can be
used (see below).
In-House Vacuum System Use
For aspirating media or other suction purposes, proper setup requires the use of
a suction flask (
B) attached to the in-house vacuum system (
D) with vacuum tubing. An in-line HEPA filter (
C) must be utilized between the suction flask and the vacuum system valve (
D). The suction flask must be properly labelled (
A) with the full name of all contents of the waste in the flask.
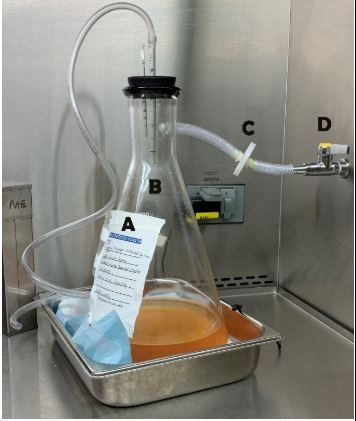
The in-line HEPA filter will provide protection against aerosols from entering the
in-house vacuum system, however great care must also be taken to not overfill the
suction flask.
In-House Vacuum System Maintenance
The in-line HEPA filter must be changed whenever the filter is compromised, wet,
or otherwise damaged. At minimum, the filter should be changed on an annual basis.
Writing the install date on the side of the filter will aid in proper replacement.
A readily available HEPA vent filter is the Whatman HEPA Vent Filter (Fisher cat.
# 09-744-79).
Any liquid waste collected in the suction flask must be immediately disinfected with
household bleach, to a final concentration of 10%. Refer to
Chapter 5: Biohazard Waste for additional guidance for treatment of liquid
biohazardous waste.
At the time of use, the suction flask can be pre-filled with household bleach so
that a 10% final concentration of the entire flask is obtained. For example, add
400 ml to a 4L flask, which will ensure a minimum of 10% concentration is obtained
throughout the work performed that day.
If pre-treating with bleach, it is only effective for approximately 24 hours, so
it must be disposed of each day.
1.2.7. SHARPS
Sharps include instruments or other objects that could readily puncture or lacerate
the skin. Some common examples of sharps are listed below. Whenever possible, consider
alternative methods with non-sharps equipment and instruments to minimize exposures
from needle-sticks or lacerations.
- Hypodermic syringes
- Razor blades
- Suture and other needles
- Scalpels
- Lancets and other fingerstick devices
- Broken glass
- Glass pipettes
- IV catheters
When sharps use is unavoidable, the follow precautions must be taken to help minimize
the risk of needle-stick or laceration:
- Syringes and needles must never be recapped.
- Sharps must be immediately disposed of within a sharps container upon completion
of use.
- Reusable sharps, such as dissection pins or razor blades, must be stored with
the blade or point covered, when not in use.
- It is recommended to store sharps in a block of Styrofoam.
- Sharps must not be left out on the lab bench when not in use.
- Sharps must be autoclaved in a hard-walled container and identify that sharps
are present within.
- If cutting tissue, hold the tissue with forceps or other mechanical devices;
never with your fingers.
Return to Table of Contents
Continue to
Chapter 8: Decontamination, Disinfection, and Spill Response
Version History:
|
Revision Control Table
|
|
Version
|
Changes
|
Revised by
|
|
1.0
|
Initial version
|
Matt Stinoski
|
|
2.1
|
Content added and updated
|
Matt Stinoski
|
3.0 (7/2/24)
|
Typos fixed, content updated, grammar changes
|
Josh Parenti
|