Background Image for Header:
Chapter 8: Decontamination, Disinfection and Spill Response
1.
DEFINITIONS:
1.1.
Contact Time:
The time that a disinfectant needs to stay wet on a surface in order to ensure
proper disinfection occurs.
1.2.
Disinfectant:
A antimicrobial agent that is applied to the surface of a non-living object to
destroy microorganisms that are living on the object.
1.3.
Disinfection:
The action of applying an antimicrobial agent to the surface of a non-living object
to destroy microorganisms that are living on the object.
1.4.
Suitable Disinfectant:
A disinfectant that has been proven effective against a specific microorganism.
2.
PROCEDURE:
2.1. Equipment Decontamination
For laboratories at Health Sciences Center, all equipment must be decontaminated
following “SOP for Decontaminating Laboratory Equipment” prior to moving between
laboratories, surplusing, or disposing. Contact the Health Sciences Center Safety
Office at 304-293-0952 for a copy of the SOP.
Laboratories on all other campuses should contact Facilities Management or their
Chemical Hygiene Officer to determine what decontamination procedures are applicable
for equipment.
2.2. Biohazard Disinfection
Common Approved Disinfectants
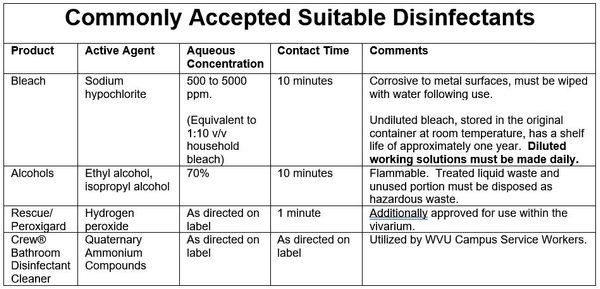
The following disinfectants (Table 1) are commonly accepted as suitable disinfectants.
Any EPA registered disinfectant is acceptable, as long as it is determined to be
suitable against the specific biohazard being utilized. Always verify with the
Biosafety Office or through your IBC protocol to ensure the disinfectant is suitable.
Table 1. Commonly Accepted Suitable Disinfectants
Equipment and Work Surfaces
A routine and appropriate disinfectant schedule is necessary to maintain a clean
laboratory and minimize the potential of exposure or contamination. At minimum,
equipment and work surfaces utilized for biohazard work should be disinfected daily
with a suitable disinfectant. Best practice would be to disinfect the potentially
contaminated work surfaces immediately after completion of the procedure. Surfaces
must be disinfected immediately following a splash or spill utilizing the Biohazard
Spill Response detailed in section 2.3 of the chapter.
2.3. Biological Spill Kit
Each lab that utilizes biohazards must stock and maintain a biological spill kit
within the lab. A biological spill kit is similar to a chemical spill kit, with
the addition of bleach. A chemical spill kit is available, free of charge, by contacting
WVU EH&S and filling out a Disposal Waste Form.
On the bottom of the form in the “Container Request” section, request a spill kit.
Bleach must be purchased by each laboratory.
The kit should include, at minimum:
Figure. 1 Proper Method to Discard Sharps During Cleanup Response
Return to Table of Contents
- Bleach
- Absorbent Materials (paper towels, pig mats, etc.)
- PPE including gloves, eye protection and face mask
- Biohazard waste bags
- Access to forceps, tongs, broom, and dustpan
- Don proper PPE including gloves and safety glasses.
- Remove contaminated sharps from site using forceps or tongs.
- Cover the spill with absorbent material (paper towels).
- Pour 10% bleach on the absorbent material.
- Wipe the area, working from the edges towards the center.
- Place absorbent material in biohazard bag for disposal.
- Wipe area with water to remove residual bleach.
- Remove PPE and wash hands thoroughly.
- Inform your supervisor.
- KEEP THE BIOSAFETY CABINET RUNNING.
- Don proper PPE including gloves, eye protection, and lab coat.
- Remove contaminated sharps from site using forceps or tongs.
- Cover the spill with absorbent material (paper towels).
- Pour appropriate disinfectant (10% bleach) on the absorbent material.
- Allow 20 minutes of contact time with bleach.
- Place absorbent material in biohazard bag for disposal.
- Wipe surface with water to remove residual bleach, working from the edges towards the center.
- Remove PPE and wash hands thoroughly.
- Inform your supervisor.
- If spill involves highly concentrated or highly pathogenic agents, leave the room for 30 minutes to allow aerosols to settle.
- Alert people in the area that a spill has occurred and keep them out of the area.
- Don proper PPE including gloves, eye protection, lab coat. More PPE (N-95 respirator or PAPR) may be necessary for high risk agents.
- Remove contaminated sharps from site using forceps or tongs.
- Cover the spill with absorbent material (paper towels).
- Pour 10% bleach on the absorbent material and allow 20 minutes of contact time with bleach.
- Wipe the spill area, working from the edges towards the center to prevent spread of contamination.
- Place absorbent material in biohazard bag for disposal.
- Wipe surface with water to remove residual bleach.
- Remove PPE and wash hands thoroughly.
- Inform your supervisor and biosafety officer (304-293-7157).
- Contact your supervisor and/or the Biosafety office, if necessary, for guidance for proper sharp disposal.
- Don appropriate PPE including nitrile or vinyl gloves and safety glasses.
- Use a mechanical device, such as tweezers, forceps, tongs, or even pliers, to carefully pick up the sharp with the point facing away from you and others. Never attempt to pick up a sharp with your hands.
- If a sharps container is available, carefully place the sharp, point first, into the sharps container.
- If a sharps container is not available, locate a hard walled container, large enough to contain the sharp, such as a drink bottle. Carefully place the sharp, point first, into the container. Cap the container and label that a sharp is present inside. Discard the sealed, labeled container in the trash.
- Disinfect the mechanical device with a suitable disinfectant.
- Remove and discard PPE.
Return to Table of Contents
Continue to Chapter 9: Transporting and Shipping Biohazards
Version History:
|
Revision Control Table |
||
|
Version |
Changes |
Revised by |
|
1.0 |
Initial version |
Matt Stinoski |
|
|
|
|